Troubleshooting
Problem
Instructions for using the iKeyman GUI utility to create a key database file and initial certificate request for IBM HTTP Server.
Related Documents:
- For instructions using the gskcapicmd command-line utility, refer to this document
- For instructions using the WebSphere Administration Console, refer to this document
- For instructions using both iKeyman and gskcapicmd specific to renewal, refer to this document
Resolving The Problem
- For the latest documentation on using the iKeyman utility, visit the IBM Knowledge Center
- For information about using Ikeyman and gskcapicmd to create new certificates, visit https://www.ibm.com/support/pages/renewing-certificate-using-ikeyman
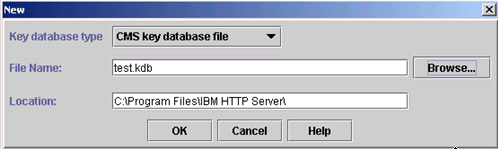
Step 1) Create a Key database (KDB) file
- Open the iKeyman utility.
- On Microsoft Windows platforms, click Start > Programs > IBM HTTP Server > Start Key Management Utility.
- On UNIX platforms, start the iKeyman utility by running: /IHS root/bin/ikeyman.sh
- From the menu bar, select Key database File > New.
- Choose a path and file name for the KDB you are creating and then click OK
- Next, you are prompted to enter a password. This is the password that will be used to open the key database file in iKeyman in the future.
- Select the checkbox Stash the password to a file? This encrypts the password and saves the file as a "*.sth" file in the same directory as the key database file.
- DO NOT select Set expiration time? This is a deprecated option to apply an expiration to the KDB password.
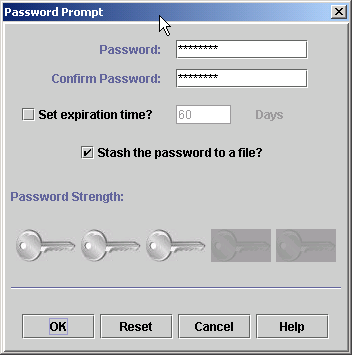
- Click OK.
Step 2) Create a new "Certificate Request" to send to a certificate authority (CA) such as Digicert or Comodo
- Open the key database file (.kdb) using the iKeyman utility.
- If you are using these instructions to create a self-signed certificate:
- Click "New self-signed" on the bottom right of the screen and skip to specifying the certificate details.
- There will be no input for an output file name. The certificate is created in a single step.
- After creating the self-signed certificate, skip to the final step in this document. The certificate is ready to use immediately.
- Click "New self-signed" on the bottom right of the screen and skip to specifying the certificate details.
- In the middle of the iKeyman GUI you will see a section called Key database content.

- Click the "down arrow" to the right, to display a list of three choices.
- Select Personal Certificate Requests.

- From the Personal Certificate Requests section, click New.

- You will be presented with the following panel, see the bullets in the following section for recommendations
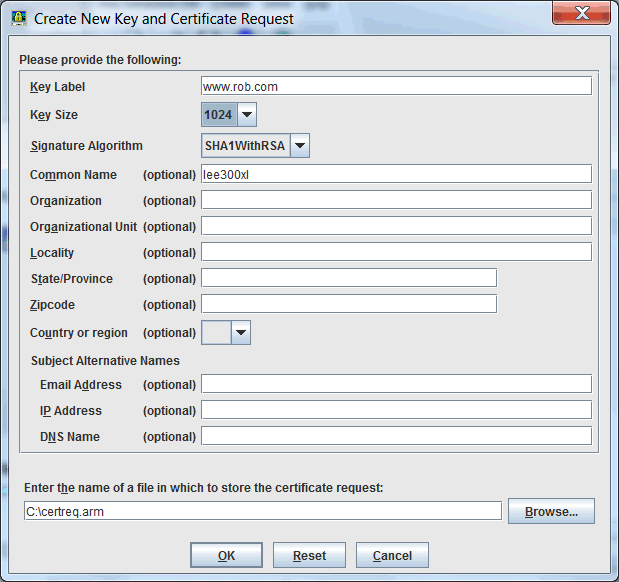
Carefully read the guidance on each field below. Do not skip any of the below fields or it is likely that browsers will not accept your certificate without warnings:- Key Label: The name you want to give the certificate to identify it in iKeyman; Consider specifying the DNS domain name and optionally a month or year of creation
- Key Size: The Key Size should be increased past 1024 to not risk being rejected by browsers. Review local security policies or select 2048. Using larger keys can cause additional CPU on busy servers.
- Signature Algorithm: Unless local policy suggests otherwise, select "sha512WithRSA". To create an ECDSA key instead of RSA, specify "sha512WithECDSA".
- Common Name: Specify the servers fully qualified domain name (www.example.com)
- Organization: Review local policy or existing certificates, usually a business/corporation name.
- Subject Alternative Name: Beginning around 2017, browsers have required that the servers fully qualified domain name appears in the Subject Alternative Name (SAN) extension.
- DNS Name: Specify any of the servers fully qualified domain names (www.example.com)
- Use spaces, commas, or semicolons to separate multiple hostnames.
- NOTE: If you are specifying a wildcard such as *.example.com, there is a current limitation in Java based tools like Ikeyman.
You must instead use the command line to create your CSR. See the documentation here: https://www.ibm.com/support/pages/node/6253339- Java based tools will return an error referencing: "DNSName components must begin with a letter" until this limitation is resolved.
- DNS Name: Specify any of the servers fully qualified domain names (www.example.com)
- Enter the name of a file in which to store the certificate request: Choose a local file system path and remember it.
- Click OK to finish. Once you save the Certificate Signing Request (CSR) *.arm file, you are done. The UI will show you an outstanding personal certificate request:
Step 3) You must now choose a certificate authority (CA) and follow the CA's instructions for sending them the *.arm CSR file.
######### CAUTION #########
Before proceeding to the next step, make a backup copy of the "*.kdb" and "*.rdb" files. Later "receive" operations are not reversible.
Before proceeding to the next step, make a backup copy of the "*.kdb" and "*.rdb" files. Later "receive" operations are not reversible.
Note: CAs usually send back an email with the certificate information provided as text in the email.
- If the CA sends back a single *.cer, *.arm, or *.crt file, follow the procedure described in the following section.
- If the CA conveys a filename like *.p12, *.pfx, or *.p7b, follow the procedure in the following section, but instead of a "receive" operation in the GUI, select "import" and follow the prompts.
- If the CA conveys any additional "signer", "issuer", or intermediate certificates in addition to your signed certificate, you should first "add" them to the "Signer Certificates" section of your KDB file.
- Open your KDB file in IKeyman and select "signer certificates" in the Key database content section in the middle of the GUI
- Click "add" and follow the prompts once for each signer/issuer/intermediate certificate supplied by the CA
- Take the information provided in the email and copy it into a text file. Save the text file with a ".crt" extension or ".arm" extension.
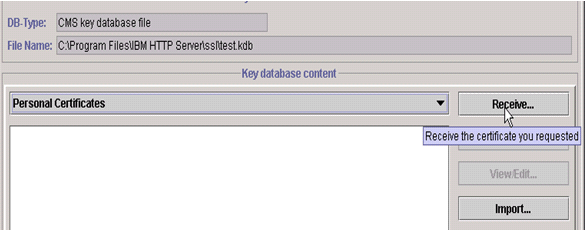
- Open the .kdb file using the iKeyman utility.
- In the middle of the iKeyman GUI you will see a section called Key database content.
- Click the "down arrow" to the right, to display a list of three choices.
- Select Personal Certificates.

- From the Personal Certificates section, click Receive.
If the CA conveyed a filename like *.p12, *.pfx, or *.p7b, instead of following the procedure in the following section, "import" the supplied file and follow the prompts.
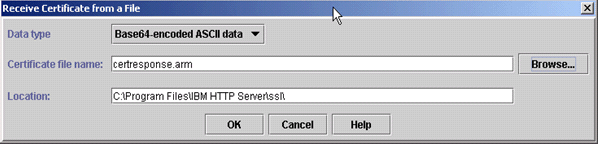
- Data type= (Leave the default of "Base64-encoded ASCII data")

- Browse to the directory that contains the .cert or .arm file
- Highlight the file and click Open.

- Now click OK on this dialog box:
- IMPORTANT: Validate your certificate
After receiving your certificate, select the new certificate label and then click the Validate button.
If errors are reported here, it is unlikely that your webserver will work. The most common error is missing a required signer certificate. The required signers should be supplied by your CA and can be added or imported in the Ikeyman GUI under the Signer Certificates section. - You're done. Make a note of your certificate label, close Ikeyman, and add/update "SSLServerCert" in httpd.conf to use your new certificate
[{"Product":{"code":"SSEQTJ","label":"IBM HTTP Server"},"Business Unit":{"code":"BU059","label":"IBM Software w\/o TPS"},"Component":"Not Applicable","Platform":[{"code":"PF002","label":"AIX"},{"code":"PF027","label":"Solaris"},{"code":"PF033","label":"Windows"}],"Version":"9.0;8.5;8.0;7.0","Edition":"","Line of Business":{"code":"LOB45","label":"Automation"}},{"Business Unit":{"code":"BU059","label":"IBM Software w\/o TPS"},"Product":{"code":"SSEQTP","label":"WebSphere Application Server"},"ARM Category":[{"code":"a8m50000000Cd9rAAC","label":"IHS->SSL"}],"Platform":[{"code":"PF025","label":"Platform Independent"}],"Version":"All Version(s)","Line of Business":{"code":"LOB45","label":"Automation"}}]
Was this topic helpful?
Document Information
Modified date:
25 May 2021
UID
swg21006430