Question & Answer
Question
How do you apply an iFix or Fix Pack to an IBM Rational release area or stand-alone version of the Rational 7.0.x family product releases on Microsoft Windows?
Answer
Note: The steps documented in this technote do not apply to product versions that use the IBM Installation Manager. If you are applying updates to an IBM Rational Team product using Installation Manager, refer to technote 1380386 for instructions.
Individual iFix patches and Fix Packs have been released for various Rational 7.0.x products.
Fix Packs and iFixes are updates that contain only defect fixes and no (or very little) enhancements.
Below are the installation options to apply the iFix or Fix Pack to your Rational product (or products).
Silent Install for Stand-alone Instructions
RELEASE AREA INSTRUCTIONS
For those products that utilize a release area for centralized installations, it is important to apply the iFix or Fix Pack to the release area. This must be done from the command line.
Note: You can only apply an iFix or Fix Pack to an existing release area of the same version. For example, you cannot upgrade a 7.0.0.0 release area to 7.0.1. You must create a 7.0.1 release area as this is a different release than 7.0.0.0.
You can optionally create a log file when applying an iFix or Fix Pack by using the following syntax after the file.msp that you are applying: /lv* C:\temp\log.txt. This syntax is used in the below example.
The iFix or Fix Pack must be installed locally to a release area. If you attempt to apply either to a remote release area, then the Windows Installer dialog will open to indicate that this is not a valid installation method.
Applying a fix pack to a release area: If you want to apply a fix pack to the Rational products in your environment, you must re-create the release area as if users are installing the products on their desktops for the first time. This new release area is used to update and install Rational desktop products. After you create this new release area, disable the old one. Disabling the old release area prevents access to the previous version of Rational products and allows access if users need to restore a system to the previous version of Rational products. Refer to the installation and upgrade documentation for your specific product for further information.
Note: Review the screen shots from the stand alone instructions for a look at the screens that will appear after executing the below commands. The screen shots are from the ClearCase product but are similar (if not the same) for the other products.
Use the following format to apply a product iFix or Fix Pack to an existing release area:
- Download the appropriate iFix or Fix Pack (*.msp file) for your product and store it on the host where the release area is located.
- Open a command prompt (Start > Run type cmd) on the host used for the release area.
- Run the following msiexec command to apply the iFix or Fix Pack (*.msp file) from the command line directly to the release area (*.msi file):
msiexec /a <complete path to the msi in the release area> /p <complete path to the msp file> Where the <UI switch> can be one of the following two options:
- /qb
Provides basic user interface; ideal if you want to see the progress of installation.
- /qn
Provides no interface at all; complete silent install.
Note: In both of the above cases, there will not be a dialog shown indicating the completion of installation at the end. The only method of verification of completion of installation is monitoring msiexec process in the Windows Task Manager.
There may be different msi files named in your release area. The number prefix (such as 1033) indicates the language of the msi file. See table 1 below for a complete index of prefix numbers.
Table 1
| Language Value |
| 1033 - English |
| 1042- Korean |
| 1028-Tradition Chinese (Taiwan) |
| 1031-German |
| 1036-French |
| 1040-Italian |
| 1041-Japanese |
| 1046-Portuguese (Brazil) |
| 2052-Simplified Chinese (PRC) |
| 3082-Spanish |
Example:
msiexec /a C:\cq_release\SETUP\1033_ClearQuest.msi /p c:\temp\1033_clearquest.msp /qb /lv* c:\temp\install.log
Notes: The following paths and names of files were used in the example above.
- The release area in this example is located C:\cq_release directory
- The msi file in this example is located in the C:\cq_release\SETUP directory
- The msi file name was 1033_ClearQuest.msi indicating the English version.
- The msp file name was 1033_clearquest.msp indicating the English version.
- The msp file was stored in the c:\temp directory
- The basic interface was selected for installation using /qb
- The directory chosen to store the log file was c:\temp
- The name of the log file chosen was install.log
Note: For release areas servicing multiple languages, you must apply each required language patch to the release area individually. Review technote 1240980 for more details.
COMMON USER ERRORS
- Install the Fix Pack before Interim Fixes
A Fix Pack must be installed before any Interim Fixes for that Fix Pack.
For example, to bring your 7.0.0.0 Release Area to 7.0.0.1 with iFix 1, you first need to apply ClearCase Fix Pack 1 (7.0.0.1) followed by ClearCase iFix (7.0.0.1_iFix01) for version 7.0.0.1.
Refer to the Prerequisites section of the specific Fixpack or iFix download page for information about version requirements.
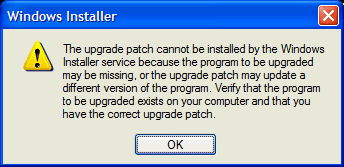
If Fix Packs and iFixes are not applied in the proper order the following error will result:
The upgrade patch cannot be installed by the Windows Installer service because the program to be upgraded may be missing, or the upgrade patch may update a different version of the program. Verify that the program to be upgraded exists on your computer and that you have the correct upgrade patch.
- Trying to skip over the Fixpack that rolls up the ifixes
Once an iFix has been installed, the next fixpack must be installed before moving to any newer release. For instance, upgrading from 7.0.0.1_iFix03 to 7.0.0.3 would require an intermediate step of applying 7.0.0.2 before you can apply 7.0.0.3 (see example below). Refer to the prerequisites listed on the patch download page for the release you are trying to apply.
Example:
Let's say you want to install 7.0.0.3. The prerequisites for 7.0.0.3 are 7.0, 7.0.0.1, 7.0.0.2, or 7.0.0.2+any ifixes
You look at your installation cleartool -ver and you see the following:
- ClearCase version 7.0.0 (Wed Apr 26 12:36:54 2006)
ClearCase version 7.0.0.0_iFix01 (Wed Jun 28 12:36:54 2006)
ClearCase version 7.0.0.0_iFix02 (Wed Sep 20 12:01:54 2006)
ClearCase version 7.0.0.1 (Wed Sep 06 12:38:22 2006)
ClearCase version 7.0.0.1_iFix01 (Fri Feb 16 12:30:05 2007)
ClearCase version 7.0.0.1_iFix02 (Fri Feb 22 17:30:55 2007)
ClearCase version 7.0.0.1_iFix03 (Wed Jun 20 12:32:58 2007)
From the above output we can see that the prerequisite version (in this example: 7.0, 7.0.0.1, 7.0.0.2, or 7.0.0.2+any ifixes) is not at the bottom of your version history, thus, you can not upgrade directly to the 7.0.0.3 release. You must first upgrade to 7.0.0.2 and then you will be able to upgrade to 7.0.0.3.
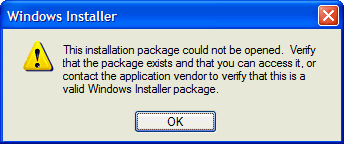
- Failure to type the correct msi file name
Failure to type the correct msi file name or type the correct path to the msi file will result in the following error:
- Failure to stop existing services
If you are applying an iFix or FixPack to a Rational ClearQuest® Web Java server, you will need to stop the ClearQuest Web Java services BEFORE you apply the update. Failure to do so may result in the following error:
Error 1904. Module C:\Program Files\Rational\ClearQuest\cqaxrform.ocx failed to register. HRESULT 3
Once the update is complete, you will need to restart the services.
Review technote 1208173 for more details.
STAND-ALONE INSTRUCTIONS
If you wish to patch a stand-alone host without patching a release area, follow the below instructions for starting the installation by double-clicking the appropriate .msp file.
Note: When installing an update to a Rational Web server, it is recommended shut-down the web services and back-up any files which have been customized for your server installation.
From command line, you can optionally create a log file when applying an iFix or Fix Pack by using /lv* C:\temp\log.txt after the file.msp in the command syntax. For example:
C:\patch-Path\7.0.0.1-RATL-RCC-WIN-en-US-IFIX01.msp /lv* C:\temp\log.txt
Note: The screen shots are from the ClearCase product but are similar (if not the same) for the other products.
- Download the iFix or Fix Pack (.msp file) for the correct language of your installation.
- Extract the archive to a location of your choosing.
- Double-click the msp file to execute and follow the instructions.
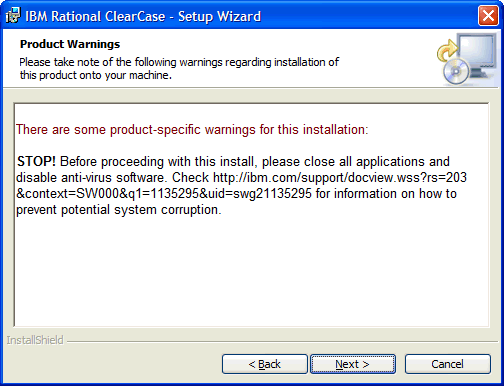
Example: Applying the ClearCase iFix
First screen appears

Click Update:

Read the Product Warnings and click Next:
Click Install to update the host:

SILENT INSTALL FOR STANDALONE INSTRUCTIONS
A silent install of an iFix or Fixpack may be run from the Windows command prompt as illustrated using the following example:
- Download the iFix or Fixpack (*.msp file) to a location of the host.
- Open a command prompt and cd to the location where the *.msp file is stored.
Example:
C:\temp>dir
Volume in drive C has no label.
Volume Serial Number is 8017-F8A8
Directory of C:\temp
06-Feb-07 08:44 AM <DIR> .
06-Feb-07 08:44 AM <DIR> ..
05-Jan-07 05:19 PM 609,232,384 7.0.0.1-RATL-RCC-WIN-en-US-FP01.msp
1 File(s) 609,232,384 bytes
2 Dir(s) 35,764,604,928 bytes free
- Execute the *.msp file using the following options:
C:\temp\7.0.0.1-RATL-RCC-WIN-en-US-FP01.msp /quiet /norestart
- Note: Either the /norestart or /forcerestart option can be used, however, with the /norestart option the machine is not restarted, it is the responsibility of the user to restart the machine. Refer to MSDN article Standard Installer Command-Line Options for important details about using these options with the /quiet option.
Review the Windows Installer options HELP dialog window (by entering a ? or typing the word help after the .msp file) for more information about options used by the Windows Installer.
Example:
C:\temp>7.0.0.1-RATL-RCC-WIN-en-US-FP01.msp help

| Change History | |
| Aug 12, 2010 | Corrected step 3 SILENT INSTALL FOR STANDALONE INSTRUCTIONS |
| Mar 23, 2009 | Changed referenced version from 7.x to 7.0.x to be more specific |
Related Information
Was this topic helpful?
Document Information
Modified date:
29 September 2018
UID
swg21242322